
Silhouette QAL – Week 1 – Choose your Own Adventure

Alright quilting adventurists, it’s time to start our Quilt A-Long! Your first step is to Choose YOUR adventure to quilt along with us! You need to choose your background layout and the silhouette applique shape you want to make.
I’m thinking one of the first questions you have is “What do I need in order to do this quilt along with you?” We’ve laid out very specific info below for what is needed if you want to do our patterns, but in general quilting terms, here is what you’ll need:
- Sewing Machine (of course)
- Fabric – in the colors of your choosing for the background and Black or a black batik for the silhouette – for amount and details… keep reading!
- Thread – You’ll need Black for the applique and then which ever color thread for your piecing you need.
- Fusible webbing – there are several kinds, we recommend a thin flexible type. The 3 of us use different kinds, and we’ll describe below.
- Quilt Batting
- An Iron – a regular iron will suffice. They also make little irons for quilters, piecers, and applique-ers. You can use any or all of them if you wish.
- Paper to trace your picture onto to make a template for your silhouette. Cheap wrapping paper with a white back works great!!
- Lastly – you’ll need to pick a shape for your applique. This can almost literally be anything you want that can be an outline of something. We’ll give lots of detail below on our choices.
There are 2 major steps in completing a silhouette quilt:
The first is piecing the background. This can be any quilt pattern you want, in any colors you want, pieced in any manner you want! In general, it’s best to do an all-the-same blocks pattern and it’s even simpler to say just squares or half square triangles will work.
The second is applying the silhouette to the background. This sounds intimidating as all get out, if you’ve never done applique. But we promise, there are so many ways to do this, if you know how to sew and iron, you WILL be able to do this!
So get your brains working on those thoughts above and read on for the details on how we three will be completing our silhouettes!
Please note that some of the links below are affiliate links, and at no additional cost to you, we will earn a commission if you decide to make a purchase after clicking through the link. We will never include an affiliate link for an item that we have not purchased ourselves without letting you know.
Shelly’s Silhouette Layout:
Pattern/Layout: Lozenge Quilt (finishes at 57 by 66 ½)
Fabric and Supply Requirements:
- 1 Layer Cake (or 42 -10 inch squares, I bought the Artisan Spirit Shimmer Blue Lagoon Stone Tiles from Northcott).
- 2 Charm Packs (or 84 – 5 inch squares, I’m using Artisan Spirit again here. I actually won a charm pack of blues and scrounged up a charm pack of greens but these are out of print, the Shimmer line like I used for my Layer Cake is available in 5 inch squares too but you really can use anything that looks good together).
- Black batik (for Applique, I bought 3 yards of the Lava Solids Jet Black Batik which is probably way more than plenty).
- Fusible web (I bought 3 yards of 18 inch wide Soft Fuse, which I’m hoping will be enough).
- Blending thread for piecing (I’ll probably go with a medium green or blue or just whatever I have on hand).
- Black thread for applique (I’m planning to machine my applique so I’ll use my favorite piecing thread in black Aurifil 50wt Cotton).
- 3 ⅝ yards backing fabric (I like to have about 4 inches of overage, here’s a calculator that you might find handy if you like a different amount of overage or decide to alter the size of your quilt)
- Batting
- ⅝ yard binding fabric (This will work if you’re doing a 2 ½ inch strip for binding, again here’s a calculator you can use if you like a different width or have decided to change the size of your quilt)
Applique Shape: The Octopus
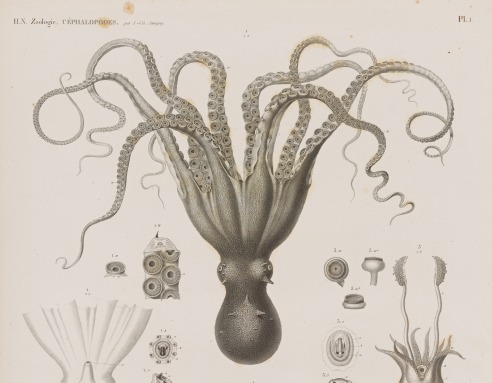 There’s a story behind this weird choice that I’ll share in a future post but here’s a link to the drawing that I’m using for the applique. My plan is to sneak into work after hours and use a projector to get the image traced onto some big paper (I’ll either use old wrapping paper or maybe trace it directly onto the fusible web.
 This is the one block that will make up the entire background.
Here are three layout options – or you can arrange however you like!
Xs and Os
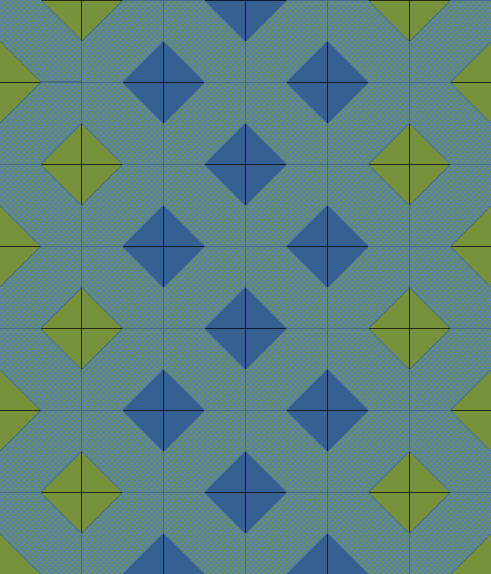
Slanted Stars:

Chevron(ish) (This is the one I’m leaning towards right now but I won’t decide for sure until I have all the blocks made and can play around with them.
![]()
Theresa’s Scrappy Layout
Pattern/Layout: On Point! Finishes at 28” x 30”, perfect wall-hanging size for my sewing room or cubicle land!
Fabric and Supply requirements:
- Scraps! I dumped my whole blue scrap bin out, and made sure to choose an even-ish amount of light, medium and medium-dark blues.
- We will need a total amount of 1 yards-ish of blue, but I only used scraps. The largest piece in this quilt is 3 inches.
- I found that when I sewed my on-point rows together, it was super easy to see which shade went where in the wall hanging.
- Gray for the buildings! I used 5 different shades, less than a fat quarter of each
- Black Batik – a fat quarter should suffice. I think I used less than a fat eighth, but you will probably want to go with a fat quarter in case your silhouette is larger than mine.
- Fusible web – I use Steam-A-Seam Lite 2. It sticks well, it’s easy to draw on, and isn’t stiff. Since this is a wall-hanging size, the sheet size of 8.5” x 11” will suffice.
- Thread for piecing. I used a neutral throughout.
- ¾ yard backing.
- 35 x 35 inches of batting
- ½ yard of binding of your choice.
Theresa’s Silhouette:
I am so excited to show my silhouette shape! Here is the silhouette shape I chose…Fearless Girl!

Fearless Girl is a sculpture by Kristen Visbal, showing a girl facing the bull of Wall Street. Fearless Girl was places on March 7, 2017 to advertise an index fund that is made up of gender-diverse companies that have a large percentage of women in their senior leadership. As a woman that has faced struggles in the corporate world, I love her and what she represents to me.
Layout: Here is the layout I chose to go with my Fearless Girl!:
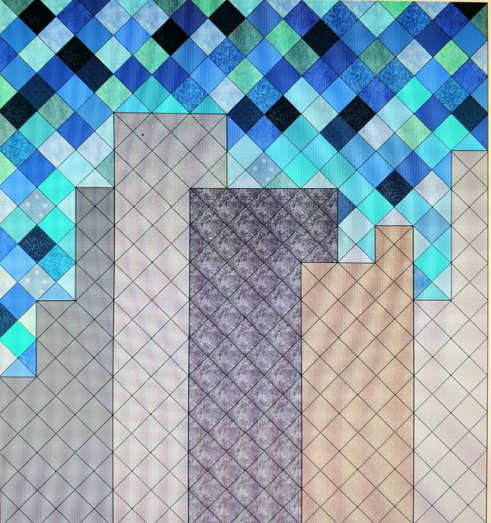
It’s not exactly the New York City skyline, but definitely represents those buildings many of us crawl to every day to eke out a living!
Stacy’s Layout
Pattern/Layout: 5″ Squares – Finishes at 81” x 91”, a good queen size!
Fabric and Supply requirements:
- 2 Layer cakes (10″ precuts) – or 4 Charm packs (5″ precuts)
- I chose 2 layer cakes of Northcott’s Stonehenge Gradations Tiles Sunglow – they are very earthy and are going to look just like a sunfilled sky!!
- Black for the silhouette – since this is a large quilt, I suggest 1 and 1/2 yards (I Always over buy so if it were me, I’d get 2 or 3 yards… but that’s just me!)
- Fusible web – I use Pellon P44F fusible – mainly I just aim to get the thinnest I can get. 2 yards will be needed for this (sounds like a lot but it’s only 20″ wide. And you know me, I bought more than that anyway (it’s only $1-ish a yard, usually)
- Thread for piecing. I used a neutral throughout.
- Black thread for the applique
- 3 yds – wide backing (108″ wide) or . 6 yards of standard width cotton fabric
- Batting – queen sized , or at least 90 x 100
- 1 yr for binding (like I said, I always over estimate!)
Stacy’s Silhouette:
Tree Swing
This is a hand drawn picture of a tree with the tree swing, I threw in some flowers and grass at the bottom. The point of this is to show you that you can draw anything you want for this silhouette quilt!! When I draw this out on larger paper, it may change slightly, but that’s the fun of it really!

Layout:
This is simply 5″ squares sewn together – 18 x 18 – Easy Peasy Lemon Squeazy!
We are already underway with our own quilts to be able to share with everyone the steps each week. Do you have thoughts in mind of what colors, layout, or silhouette pictures you’re going to use? Let us know in the comments if you’re thinking about following along with us, we would LOVE to hear from you!

4 Responses to “Silhouette QAL – Week 1 – Choose your Own Adventure”
[…] Week One Choose your background layout and silhouette applique shape! […]
LikeLike
I started working on a silhouette quilt before finding this. Serendipity! Not sure that I will “quilt along,” but I will follow. I hope you get good turnout on it.
LikeLike
[…] you have all your fabrics selected, cut and marked. For a reminder on each of our layouts see our Week 1 Post, choosing your colors see Week 2, and the prep of the fabrics, see last week’s post here. […]
LikeLike
[…] machine applique (even with my huge twisty octopus) was crazy fast, only took a few hours for a few days. Even going slowly it felt significantly […]
LikeLike