
Silhouette Quilt Along – Week 6 – Getting ready for Applique!

Stacy here – Are you ready to start your applique?! Don’t be worried, we’ll walk you through it! (And this is my first time with a project like this too, so we’re learning together – as you will see in my piece below )
Let’s review the supply list you’ll need for this step:
Supply list:
- Big paper (craft paper from paint section at the hardware store is cheap and sturdy, wrapping paper will work in a pinch)
- Unless you’re doing a small piece like Theresa, then you just need regular paper
- Blue painters tape (or any tape that works)
- Pencil or markers
- Your Silhouette picture of choice
- Fusible Web (Shelly used 3 yards of 18 inch wide Soft Fuse)
Shelly’s Stuffs
For big applique you need some really big paper and access to a projector. For the paper, I used a big roll of craft paper (3 ft by 140 ft for 12 bucks at Lowes in the paint section). For the projector, I snuck into the office I work at after hours and used one there!
Not everyone works somewhere with projectors though, so I called around and confirmed (in our area at least) most of the local public libraries have projectors you can use.
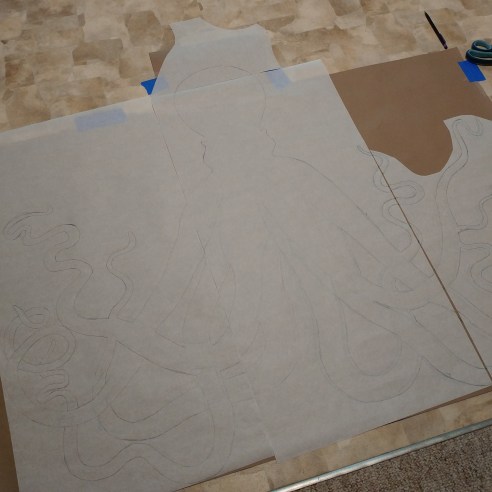
Since my plan for my applique was for it to be almost as wide as the quilt, I cut off 2 strips from my roll of paper that were as wide as my quilt and taped them both up on the wall. Then I used the projector to display the picture on the paper and fiddled with it until the size felt right. NOTE: you are tracing the image backwards as it will appear on the quilt. Keep that in mind if your silhouette has to display in a specific direction.

Next, on the paper I traced around the projected image. In my case there was a whiteboard behind my paper so I used a dry erase marker just in case it bled through. If you’ve just got a wall back there you might want to use a pen or pencil. As long as the tracing is dark enough for the next step, you’ll be good…

Then I finally left work (ha!). At home I laid my paper with the traced picture out on the floor and taped it down, just so it wouldn’t move. I put my fusible web over the top with the paper side up and taped that too so it doesn’t move. Then, I traced the image onto the paper side of my fusible web.
And now… Time for some ironing! With the rough (non-paper) side of the fusible web facing down (traced image facing up), I fused the applique down onto my black batik fabric. Since it’s batik, it doesn’t matter which side you fuse it to.
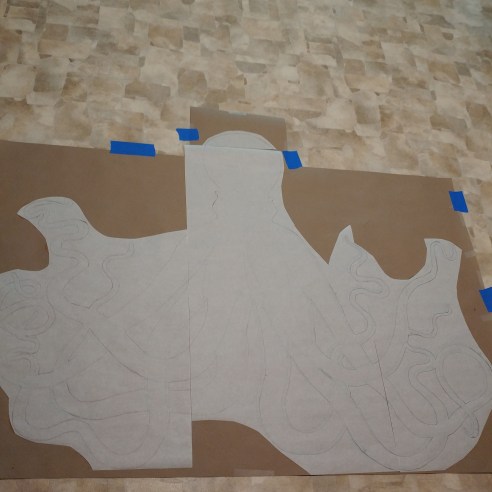
Once the fusing was done I sat on the couch and cut it all out. No seam allowance needed, just cut along your traced picture.
The next step is to fuse it onto the background but I haven’t gotten to that step just yet. One thing to note is that if you’re fusing down multiple pieces (mine turned out to fit on one with of fabric) you’ll have an easier time if you fuse one piece and then do the applique stitching that we’ll talk about next week before fusing the next piece down. Just laying it out on there was pretty exciting though! Here’s a sneak peak.

I’m way way too excited about this!
This is the challenging part if you haven’t done applique before. Read the directions that come with your fusible and follow them carefully. We’re here to help if you have any questions!
Theresa’s Stuffs
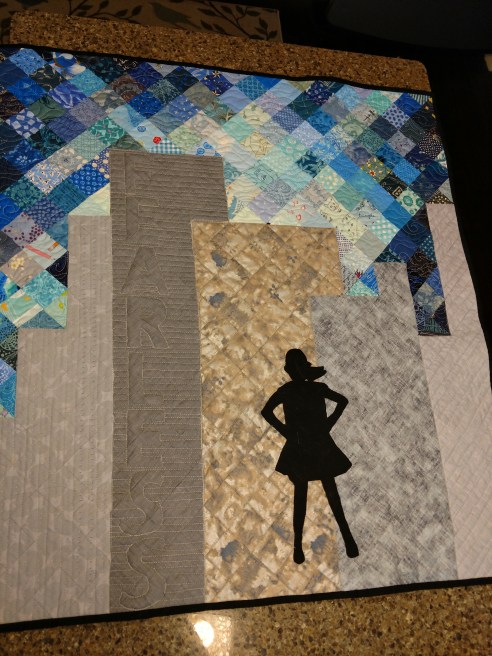
Oh my gosh, my silhouette, like my quilt, is small. I used an image of FEARLESS GIRL to place in front of my buildings. Since my image was small, I simply printed the image on a regular size sheet of paper, then traced around it, and flipped it over to draw on the fusible web (outlined nicely by Shelly above). Why did I flip the paper over? It’s super easy to forget that the image will be in reverse once traced on the fusible web. I’ve forgotten before, and if it’s a directional image it stinks having to do it over.
I love Fearless Girl!
Stacy’s Stuffs
For my silhouette, I’m doing a hand drawn scene of a tree and tree swing – roughly close to this:

I’d be absolutely tickled if someone else tried this too! BUT, my instructions are really for any hand drawn silhouette shape or scene you want to try. I’ll describe what did – and how I realized what I did wrong so you can do it better!
I first pinned my quilt top background to the wall and pinned a (not big enough) piece of paper to that along the top where the branch would go. After I began to sketch this out, I realized I wanted more paper in places so I taped other pieces here and there to get the size I wanted. (BTW, I used old Christmas wrapping paper, it had a white back so it worked well!)
I then realized all of that paper taping to the quilt background was totally the hard way to do this. I should have just cut a piece of paper the width of my quilt top for the top branch of the tree and just taped the paper to the wall like this. (ignore the unfinished drywall):

So, as I’m sketching out my design, I’ve decided I want my top branch to be covered in leaves (because I’m a glutton for punishment, when it comes to quilting this later). You can choose whichever shape you want for the branch and tree. I also sketched out a rough line for the tree trunk along the right side. When I was happy with this I cut it out and laid it on my quilt top to see how it would look:

I did the same with all the other pieces of the silhouette; the tree swing, the tree trunk, the ground and tufts of grass, and the flowers at the bottom left.
Now it’s time to transfer to the fusible webbing! I did this in pieces since my scene is so big. I taped my cut out drawing back up on the wall. VERY IMPORTANT NOTE – if your picture is directional like mine (meaning I want my tree trunk on the right) then you need to place your cut out image BACKWARDS on the wall….. ask me how I know this….
I cut a piece of fusible the length of the top branch and taped it to the wall on top of that with paper side up. Then I just traced it out. If you want to add differences or change anything to your unique drawing, now is the time! (Look at that awesome Christmas paper – haha!)

Once you have all your pieces traced to your fusible, you’re ready to iron it down to the black. Follow the directions on the fusible product you have. I suggest you do this in pieces as well, like with the drawing. Once you’ve ironed it down, then cut it out along the traced lines and you’ll be ready to fuse it to the background! One thing to note is that if you’re fusing down multiple pieces you’ll have an easier time if you fuse one piece and then do the applique stitching that we’ll talk about next week before fusing the next piece down.
Don’t have a projector or any hand drawing skills?
Depending on the size and style of the image you chose, this is a pretty big step in the process. And if none of the above described methods work for you to create your image big enough for you to trace (i.e. you don’t have access to a projector, you can’t hand draw the image, and it’s bigger than one sheet of paper!) here’s one more way you can do it, you just need access to Excel and a printer:
- Open a new Excel document, change your view to ‘page break preview’
- zoom out to 10%,
- paste your picture onto the excel page and drag the corner to make it bigger
- you’ll have to do a little math to figure out how big to make it, (hey we math all the time in quilting, right?!)
- When you’ve got it where you think it will print out big enough, then you hit print!
- Make sure it only prints on one side, not double sided
- This is going to print out over dozens of pages (I hear tell of someone doing this and printed 80 pages?! … But I won’t name names… 🙂
- It’s probably going to be blurry, but as long as you can trace the general outline, you’ll be okay.
- When it’s all printed, you have to put it together like a puzzle and tape it together. If you keep the pages in order, they should lay out in order too.
We would love to hear from you in the comments on your thoughts if you’ve ever done this kind of applique before. Or if you’re attempting it along with us and have questions or get stuck in a spot!
Happy tracing!

2 Responses to “Silhouette Quilt Along – Week 6 – Getting ready for Applique!”
[…] Shelly here! Did you get your applique all prepped and fused onto your background last week? If so, you’re all ready for this week’s task. This week we’re stitching the applique […]
LikeLike
[…] Week Six Create silhouette applique image […]
LikeLike