
Silhouette Quilt Along – Adventures in applique! – Week Seven

Hi, Shelly here! Did you get your applique all prepped and fused onto your background last week? If so, you’re all ready for this week’s task. This week we’re stitching the applique piece down so it’ll stay there and have a nice finished look.
Quick note from Stacy: I’m a bit behind because I’ve chosen to do such a huge quilt! But my process is basically the same as Shelly’s process. So if you’re following along with me, this week you can follow along with her.
Shelly’s Stuffs
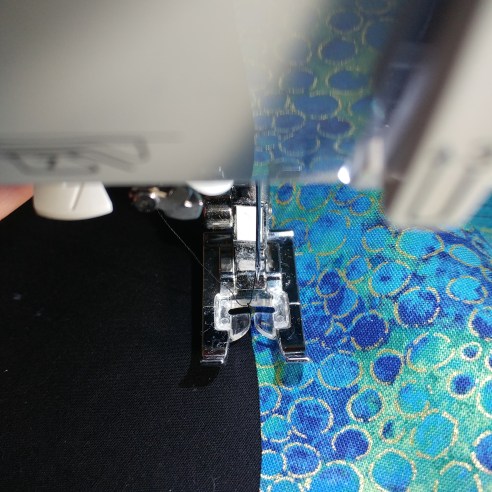
Okay so your piece is all fused down and all there is left is to stitch it onto your background and your applique will be finished! Since my applique is super huge I decided to do the applique by machine instead of by hand to avoid it taking months and months (for what it’s worth though I did my Calvin and Hobbes quilt applique by hand and really enjoyed it). Skip down to Theresa’s Stuffs if you want to try it by hand or if your machine doesn’t have a blanket stitch and you have to.
When doing machine applique I like to use a thread color that matches the applique fabric as it’s more forgiving and hides some of the imperfections.
Before you start you’ll want to choose the blanket stitch setting on your machine which will look something like the stitches in the picture below. The first step I took was to sew a test piece, I just cut some random shape out of scrap and appliqued it to another random scrap. This will give you a chance to get familiar with the pattern of the stitch (which I’ll talk more about later) and to fiddle with the settings until you like the size and look of the stitch. It’ll also give you a chance to practice so it can be helpful to look at your real applique shape and cut your scrap to something that will mirror the most challenging parts of it (for example sharp curves and inside or outside corners).
Once I made a decision I snapped a quick pic of the settings I decided to use so that I could make sure to keep it consistent throughout the quilt even if I did some other sewing in between.

You want to be really familiar with the pattern of the stitch so that you can start, stop and pivot the quilt at a particular time in the stitch to avoid icky looking stitches on your quilt. In the video below the stitch moves forward, back, forward, in towards the applique, and back out towards the edge of the applique and then it repeats. Anytime you’re stopping or pivoting your quilt you’re going to make sure that the stitch first stops after it has gone back over the previous stitch (ie at the end of the forward, back, forward, or at the end of the in, out).
Only one more thing and you’re ready to start! Choose where you want to begin. I like to choose a nice smooth curve to start that isn’t quilt front and center so that if my connection back up to it at the end isn’t perfect it’ll be a little less visible.
You can take a few tacking stitches (my machine has a little button for this but you can also use a straight stitch set to a very short stitch length to accomplish it) and then get going. Another option would be to pull up your bobbin thread so you can bury it. To do this you can grab a hold of the top thread and hold it while putting your needle down.

Then put the needle back up and give a slight tug to your top thread and the bobbin thread will pop up.
Once your bobbin thread is up you can grab it with your fingers or a pair of tweezers and pull a few inches of it through.

Now you can pull those threads out of the way and start doing your blanket stitch. I tend to do this stitch pretty slowly on sharper curves and going a little faster on straighter lines or smoother curves. When you hit a sharp corner (or on a very tight curve) you’ll want to stop your stitch with the needle down, lift your presser foot, and pivot the quilt so you’re lined up with the applique where you want to continue stitching. Remember to stop at the right part of your stitch so that you won’t end up with any weirdness. The stitch pattern again is “forward, back, forward, in, out, repeat”. I like to stop for the pivot right after “out”. Here’s a pic of my needle down on an inside corner right before I did the pivot. (please excuse the fuzz… Ha! )

That’s basically it! Just keep going until you’ve got it all done.
Challenges I ran into and how I solved them:
- Ran out of bobbin thread – since I’m choosing to bury my threads I went ahead and picked out stitches until I had enough to be able to bury those
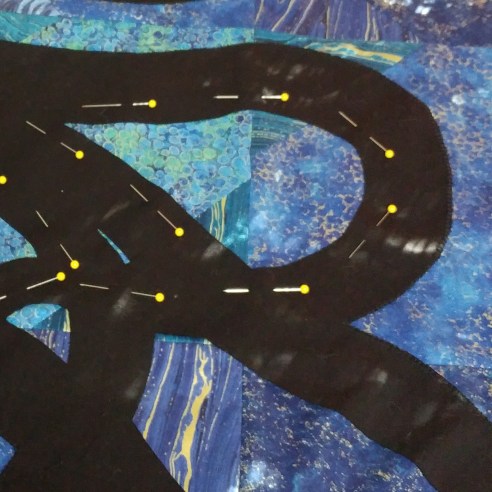
- Applique didn’t stay fused down – This was my first time using Soft Fuse. I LOVED how thin and flexible it was so that my very large applique didn’t end up super stiff. However it just didn’t always stay down. As I was going through the applique when I got to a place that wasn’t staying down well enough to continue I would cut thread, head back to the ironing board and refuse it. This generally worked but caused a bit more stopping and starting than I would have preferred but the outcome was totally worth it.
- Applique really didn’t stay fused down – As I got toward the end the fusible really wasn’t staying very well (I think from having to cram it through the throat of my machine over and over) so I started pinning it down after re-fusing and only doing small sections at a time so it would have a better chance of staying fused until I got it stitched down.
- Yet another note on the applique not staying fused down – my applique all fit onto one width of fabric so I did it without any seams, if you’re applying multiple pieces you’ll want to figure out their exact locations but fuse and applique them one piece at a time. I did this with my Calvin and Hobbes quilt and it worked out much better, at the places where the pieces overlapped I did a blanket stitch to make the connection look decorative instead of like a flaw or mistake.
Once you’re all done if you’ve decided to bury threads you’ll need to go back through and do that. I haven’t done mine yet so I don’t have any pics but here are the basic steps:
- Thread the tails into a hand needle.
- Take a stitch into the same hole the tails are sticking out of
- Tie off on the back of the quilt and clip the threads about an inch from the knot.
So far I’ve tried Wonder Under and Soft Fuse for these very large appliques and I liked the Soft Fuse better due to the thinness and flexibility. I think I want to try one more with Steam-a-Seam Lite 2 (which is Theresa’s favorite) but even with the challenges I ran into with the fuse not sticking I think the effort is totally worth how impactful the finish is. Can’t wait to share a pic of my finished top next week!
Theresa’s Stuffs
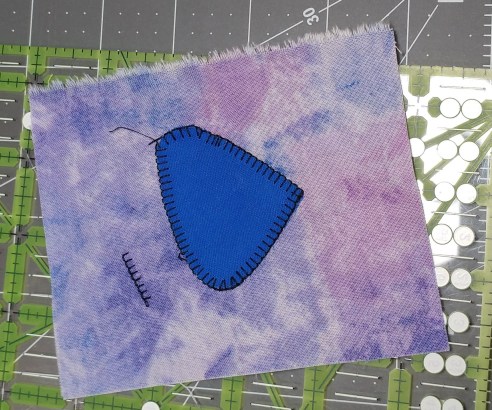
My sweet little fearless girl is so little, I decided to do hand applique using the blanket stitch. I love applique, and I especially love sitting on the couch, chatting with my husband, watching a little television, while watching my applique come to life with slow stitches.
Hand applique is not hard, but it does take a little bit of time and practice to achieve even.stitches. Tiny stitches doesn’t mean better, it’s more the consistency in stitch length that gives the applique piece a polished look.
As I used black floss on a black silhouette shape, I have done a little sample piece to show you in color how the stitches are done.
- For supplies to permanently stitch down your appliqued shape, you will need a needle and thread. Now, what kind of thread will you need? From my experience, most hand applique is done with two strands of DMC floss matching the color of the applique. However, it can be done with regular thread, contrasting colors.
- What kind of needle? I use an embroidery needle because it has a larger eye than finer needles. This means I can easy thread the needle without screaming, trying over and over to get two strands of floss through a tiny eye.
- Handy note: embroidery floss comes in a skein with six strands. I suppose there’s a reason why they do this, but that ain’t my hobby. So, for applique, separate two strands out of each cut length.
As Shelly mentions above, I’m in love with Steam-A-Seam Lite 2. I think with any fusible product, handling and humidity can affect the ‘stick’ but I’ve had.consistent good results with this product.
Here’s the basics on how to do the blanket stitch (also called the buttonhole stitch) around your applique:
- Cut your six strands floss to a 18 to 24 length. My grandma told me if I can stitch with thread longer than that, I’m a witch! So I keep trying! But any longer than that and snaggles and tangles happen. Boo!
- After threading your needle, tie a knot in the end.
- Bring your needle up from the backside, right on the edge of where the applique meets the background:

- Run the needle through the applique and back out of the edge, right at about the same spot you brought up your needle.

- Catch the thread from the stitch under the tip of the needle

- Pull the stitch tight, and repeat. The next stitch should be approximately a quarter inch over.

- Corners are stitched with an extra stitch right at the angle, or with stitches on either side


Once complete, tie off the floss with a knot on the back.
Consistency is what matters here. Keep the width between stitches the same, as well as the depth of the stitches for an excellent presentation. Be careful though, you may fall in love too!

2 Responses to “Silhouette Quilt Along – Adventures in applique! – Week Seven”
[…] Week Seven Iron applique onto background […]
LikeLike
[…] everything Shelly described in week 7 is spot on for what you need to do a larger applique. Definitely bookmark that page and use it as […]
LikeLike